If you have never utilized a vacuum chucking system to enhance your turnings, I highly recommend looking into setting one up. A vacuum system increases the flexibility of your lathe by making it much easier to hold oddly shaped turnings. It also makes finishing off the bottom of a turning much easier as it can hold the piece being worked on without needing the tailstock to hold it in place.
A basic vacuum system consists of three major pieces: the vacuum pump, the rotary fitting which enables the vacuum to travel through the headstock, and the vacuum chuck. The vacuum chuck seals against the work and allows the vacuum created by the pump to hold the work securely.
It is possible to purchase vacuum chucks of various sizes, but why spend the money when you can use your lathe to make your own for a few dollars?
When I have a project in mind, but no specific plans, I often go to the hardware store to begin the brainstorming session hoping to formulate a plan. In this case, I went to the store hoping to come up with a solution for creating a seal between the vacuum chuck and the piece being worked on. I knew that there were options available to purchase such as adhesive foam pads that could be stuck onto the chuck, but I wanted something stronger and more permanent. I looked at several other options including pipe insulation, insulation rope, and even a piece of rubber shower pan material. None of them held much promise as I didn’t think they would last long, or were so soft or thin that it would be nearly impossible to seal against an oddly shaped piece of work. I had given up and started heading toward the door when I looked down and found the perfect solution! It is rubber, round, flexible, and already designed to seal against a smooth surface.
It was a toilet plunger!
And it was dirt cheap!
At this point, I walked back to the PVC rack and grabbed both a 3†and 4†coupling and returned to the plungers. It turns out that of the four different plungers available, two of them fit the PVC fittings perfectly! I now had the makings for a very flexible and effective vacuum chuck.
I photographed the process in order to make it easy to follow. If anyone has any questions at all, please feel free to drop me a line. The instructions below show how I made the chuck using the 3†PVC coupling. The 4†chuck will be slightly different as the plunger is different, but the same steps and techniques work for both.
Step 1:
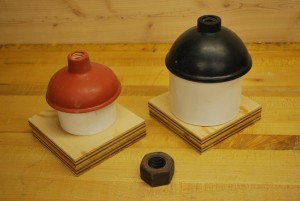 Here you see everything needed to make a vacuum chuck. The assembly on the left plus the nut in the foreground is all that is needed to build a 3†chuck. The nut to fit the spindle of my Powermatic lathe is 1 1/4†x 8 tpi. Your lathe may be different. I was able to purchase this nut from MSC Industrial Supply (mscdirect.com) for $3.33. I could have threaded the wood to fit on the spindle, but I didn’t know how well the plywood would take a tap, and I wanted it to last a long time.
Step 2:
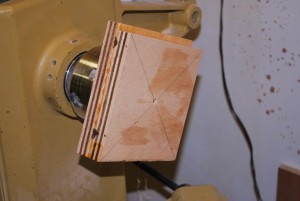 I laminated two pieces of plywood together in order to make sure that I had enough depth for the nut and the PVC. The extra layer of plywood also provides a lot more strength against the pull of the vacuum. Once the glue was dried, I drilled a hole for my screw chuck so that I could mount it on the lathe. This hole also provides a path for the air to follow as it is being removed by the vacuum pump.
Step 3:
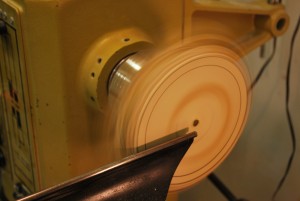 Once mounted, I turned the plywood round. Be careful at this stage and make sure you wear appropriate safety equipment. Wear eye protection because the plywood can splinter. Wear a dust mask because turning the plywood throws a LOT of dust in the air. Remember, some of that dust is the glue used to hold the laminations together. You really don’t want to be breathing that. In this picture you can see the line I created showing where I was going to need to cut the groove for the PVC coupling.
Step 4:
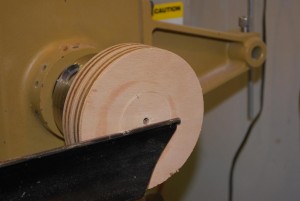 Once the blank is turned round, it is time to mark out where the mounting nut will be placed. Remount the just completed disk backward so you have access to what will be the ‘back’ of the chuck. Here you can see that I have marked where I need to cut in order to fit the nut. This cut needs to be accurate and should only be as large as the largest diameter of the nut. This would be the point to point distance across the nut. If this cut is accurate, then the nut will fit perfectly and be on center. Once you have the measurement, then using whatever tool you feel comfortable with, clear out the center to a depth of about 1/4†inch. This is not critical, but you want to make it deep enough for the epoxy to hold the nut in place.
Step 5:
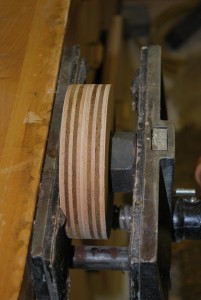 If there is raised lettering on your nut, remove it with your grinder. In a perfect world you will be referencing this side of the nut against the headstock. Once the space for the nut is cleared in Step 4, remove it from the lathe and put it in your vice with the nut as you see here. Make sure the SMOOTHEST side of the nut is out. This will help set the nut in place and if there are any raised spots on the nut, will help embed them into the wood.
Step 6:
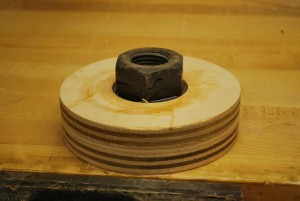 Using epoxy, glue the nut into the recess cut into the wood. Fill the open spaces between the exterior of the nut and the wood disk as well as the interior of the nut. For this job I prefer to use the sixty (60) minute epoxy as it will have more time to level out on the inside of the nut, but use whatever you are comfortable with. Be careful to avoid getting epoxy on the threads. If you temporarily plug the hole in the disk with paper towel, you can put about 1/8†– 1/4†of epoxy in the bottom. This epoxy will level out and create a good surface for the headstock spindle to seat against.
Step 7:
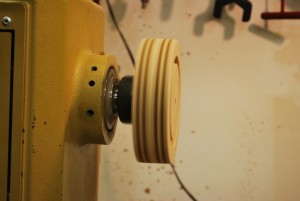 Once the epoxy in step 6 is dry, you should be able to spin the assembly onto the lathe. Make sure that the nut goes on as far as possible. Don’t be discouraged if the nut does not seat on the end of the spindle. Mine does not, but still works beautifully. Once mounted, true up the edges, measure the PVC coupling and cut a groove that matches the outside diameter of the coupling. Don’t make this groove too wide as it will allow the coupling to move while the epoxy sets leaving it off center.
Step 8:
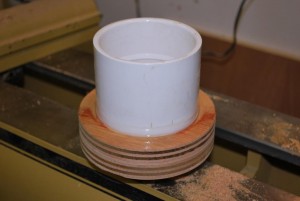 Once the PVC fits perfectly in the groove, mix up some more epoxy and glue the coupling to the disk. In order to guarantee an air-tight seal, I put epoxy both along the inside and outside of the coupling.
Step 9:
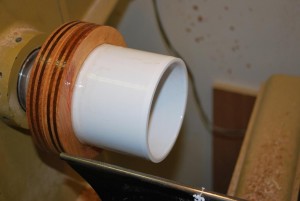 Once the epoxy has dried, put the chuck back on the lathe. Despite your best efforts, the coupling will probably not run true. This is not a big problem as long as it is only slightly off. I quick touch up with a parting tool, or skew or scraper should clean that right up. In this instance I only needed to remove about 1/32†of PVC to true the end up.
Step 10:
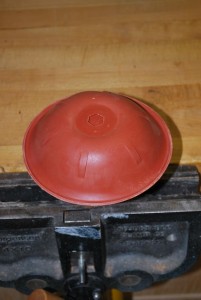
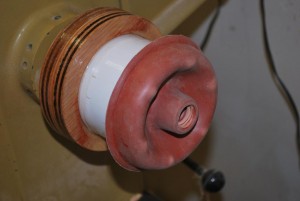
Now that the PVC is trued up and ready to go, it is time to look at the plunger. If you look at the picture you will notice that there are ridges on the inside of this particular plunger. The plunger has been turned inside out for this picture. If you don’t do anything about these ridges, they will show up as large bumps on the outside when the vacuum is applied as shown in the next picture.
Step 11:
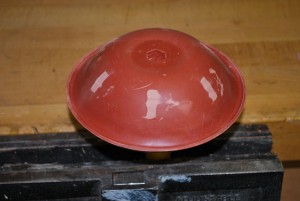 To take care of these ridges, it is a simple process of cutting them off. The rubber is soft enough that it is easy to remove the ridges with a sharp utility knife.
Step 12:
Once the ridges are removed, it is now time to attach the plunger to the chuck. The first time I did this, I used epoxy. The problem with that is that while the rubber is flexible, the epoxy is not. This caused the plunger to pull away from the epoxy. I ended up using adhesive bathroom caulk! This is flexible and holds the plunger in place quite well. First, spread some caulk around the lip of the PVC, then place the plunger on the top and center it as best as possible. When the caulk has dried enough to hold the plunger in place, turn it over so that the plunger is on the bottom. This will expose the lip of the plunger and will enable you to put a bead of caulk around the gap between the plunger and the PVC coupling effectively sealing it.
Step 13:
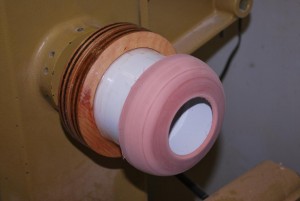 When the caulk is dry it is time to mount it to the lathe and finish it up! With the chuck on the lathe, turn the lathe on slowly and using a skew clean up any rough edges and remove any loose rubber. Use the skew to cut out the center of the plunger leaving a hole approximately two inches or more in diameter. Sandpaper was lightly used to remove the glossy finish on the rubber as it seems to seal better.
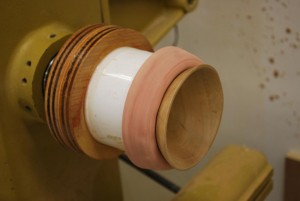 The reason for leaving so much of the plunger in the center is that it gives us the ability to seal against the inside of the chuck as well as the outside.
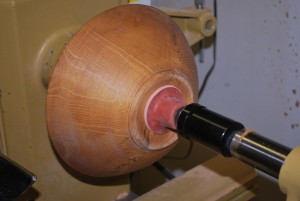 Save the piece cut out from middle! By using it to cover the point on your tailstock’s live center, it makes a great, non-marring way to hold your work against the vacuum chuck or other jam chuck.
Step 14:
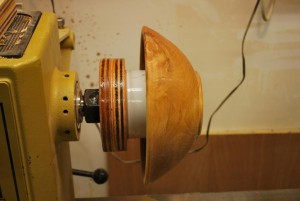
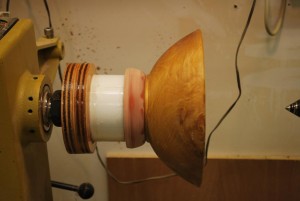
Now you are ready to test your work! You can see from the photos below, that the chuck is quite flexible when it comes to holding your work. The bowl in the pictures below was held so securely in either position, that I could have easily put some finishing touches or sanded them without fear of the bowl coming off. That being said, it is never wise to trust ONLY in the vacuum. I always use the tailstock for support unless it is absolutely impossible to make the cut with it there. After making sure that I sealed any obvious leaks in my vacuum system, I was able to keep a piece of work on this chuck for nearly two minutes after my pump was turned off. The rubber used in the plunger seals extremely well.

What type of suction did you use?
I have a small Baldor vacuum pump that I purchased used for about $50. I will be putting information on my whole vacuum system soon. I highly recommend a vacuum system if you can set one up as it really adds to your flexibility for mounting.
Bob
Really cool idea! I’m pretty new to this, so I didn’t even know vacuum chucks were used on lathes.
I m a beginner @ turning& really liked your article. How do I find info for ordering a motor for the vacuum chuck as I would like 2 build this apparatus soon. Thanx
Check out this article here: http://www.wbnoble.com/WN_articles/vacuum_chuck/vacuum-chucks.pdf it is full of great information!
dead link in the 2/22/14 post…
Hey, Thanks for letting me know! The article in question was removed but can be found here: http://www.wbnoble.com/WN_articles/vacuum_chuck/vacuum-chucks.pdf.
Wanting to build my own vacuum coupler. The article you wrote seems simple enough. One exception, rotary coupling.
Sorry for the delay getting back to you, but I was out of the country.
This article assumed that you already had a vacuum system set up. I looked at building my own vacuum coupler several years ago and decided that while it might be interesting to build, I thought I would purchase one guaranteed not to leak. I ended up with the Oneway adapter http://www.packardwoodworks.com/Merchant2/merchant.mvc?Screen=PROD&Store_Code=packard&Product_Code=111045&Category_Code=lathes-acc-vc-oneway and really like it. The fit and finish was well worth the money.
Let me know if there is anything else I can do for you!
Great idea! Please clarify: After you turn the plunger inside out to remove the ridges, do you glue it on to the PVC inside out or back in the original way that it is normally used as a toilet plunger?
Sorry about the delay in getting back to you. I’ve been building the new shop and haven’t had a chance to reply.
I am glad you liked my vacuum chuck. I have to say it works better than I had expected…and the price was right! To answer your question, once I removed the ridges from inside the plunger I flipped the plunger back to its original position so that the inside of the plunger is against the PVC.
If you have any more questions I am happy to help!
I am working on a new website at eaglecliffstudios.com. It will be several weeks but it will be up!
Thanks.